If you are a regular reader, you know that DIY isn’t really my thing. But I’m not completely useless when it comes to sprucing up my home…
Do you have an empty wall in your home that is crying out for some artwork? Maybe you have a bunch of great photographs that are collecting dust in a drawer, or more likely still on your memory card in your camera. With less than $50 and some patience, you can create a focal point with a wall photo arrangement.

After my daughter’s bat mitzvah, we had so many great photographs that I wanted to show off, but only so many surfaces to put them on. But I had a wall in my living room that was woefully bare. Armed with an old newspaper, a ruler, a level, and a pencil, I planned out an arrangement of eight photos that create a huge impact in the room.
The key is to arrange the photos above and below a straight horizontal line. The process does require some forethought and careful planning, though, before you start hammering nails and buying frames. Here’s how to do it:
1. Choose your photos. I followed the principle of decorating in odd numbers, and chose nine photographs. However, once I started, I found that for the sizes I had, eight worked better. Some photos were 5×7, and some were 8×10. I also had one 11×14 photo.
2. Purchase frames. For a cohesive grouping, I suggest using similar frames. I chose simple and inexpensive black frames from Michael’s. By using frames with large mats, you can cover a larger area even with smaller photos. The frames for my 5×7 photos were matted to 8×10 size, the 8×10 photos were matted to 11×14 size, and the 11×14 photo was matted to 16×20.
3. Plan your arrangement. Cut pieces of newspaper to the size of your frames, and spread them out on the floor. Arrange them both above and below a horizontal line, varying sizes and orientations (vertical and horizontal) until you are happy with the placement.
4. Draw your horizontal line on the wall in pencil, using a level. Tape the newspaper templates in position and make sure you like the way it looks. Space the templates an inch apart from one another and a half inch above or below the line.
5. Hang photos above the line first. This can get tricky, as the hardware may be a few inches below the top of the frame. Have patience; it took me awhile to get each frame hung correctly. The ruler and a pencil are essential at this point. I measured where the hanging hooks were on the frames and marked the locations on the newspaper templates, then hammered right through the newspaper.
6. Have a glass of wine and call it a day. Come back the next day and finish the bottom row.
7. Step back and admire your handiwork!
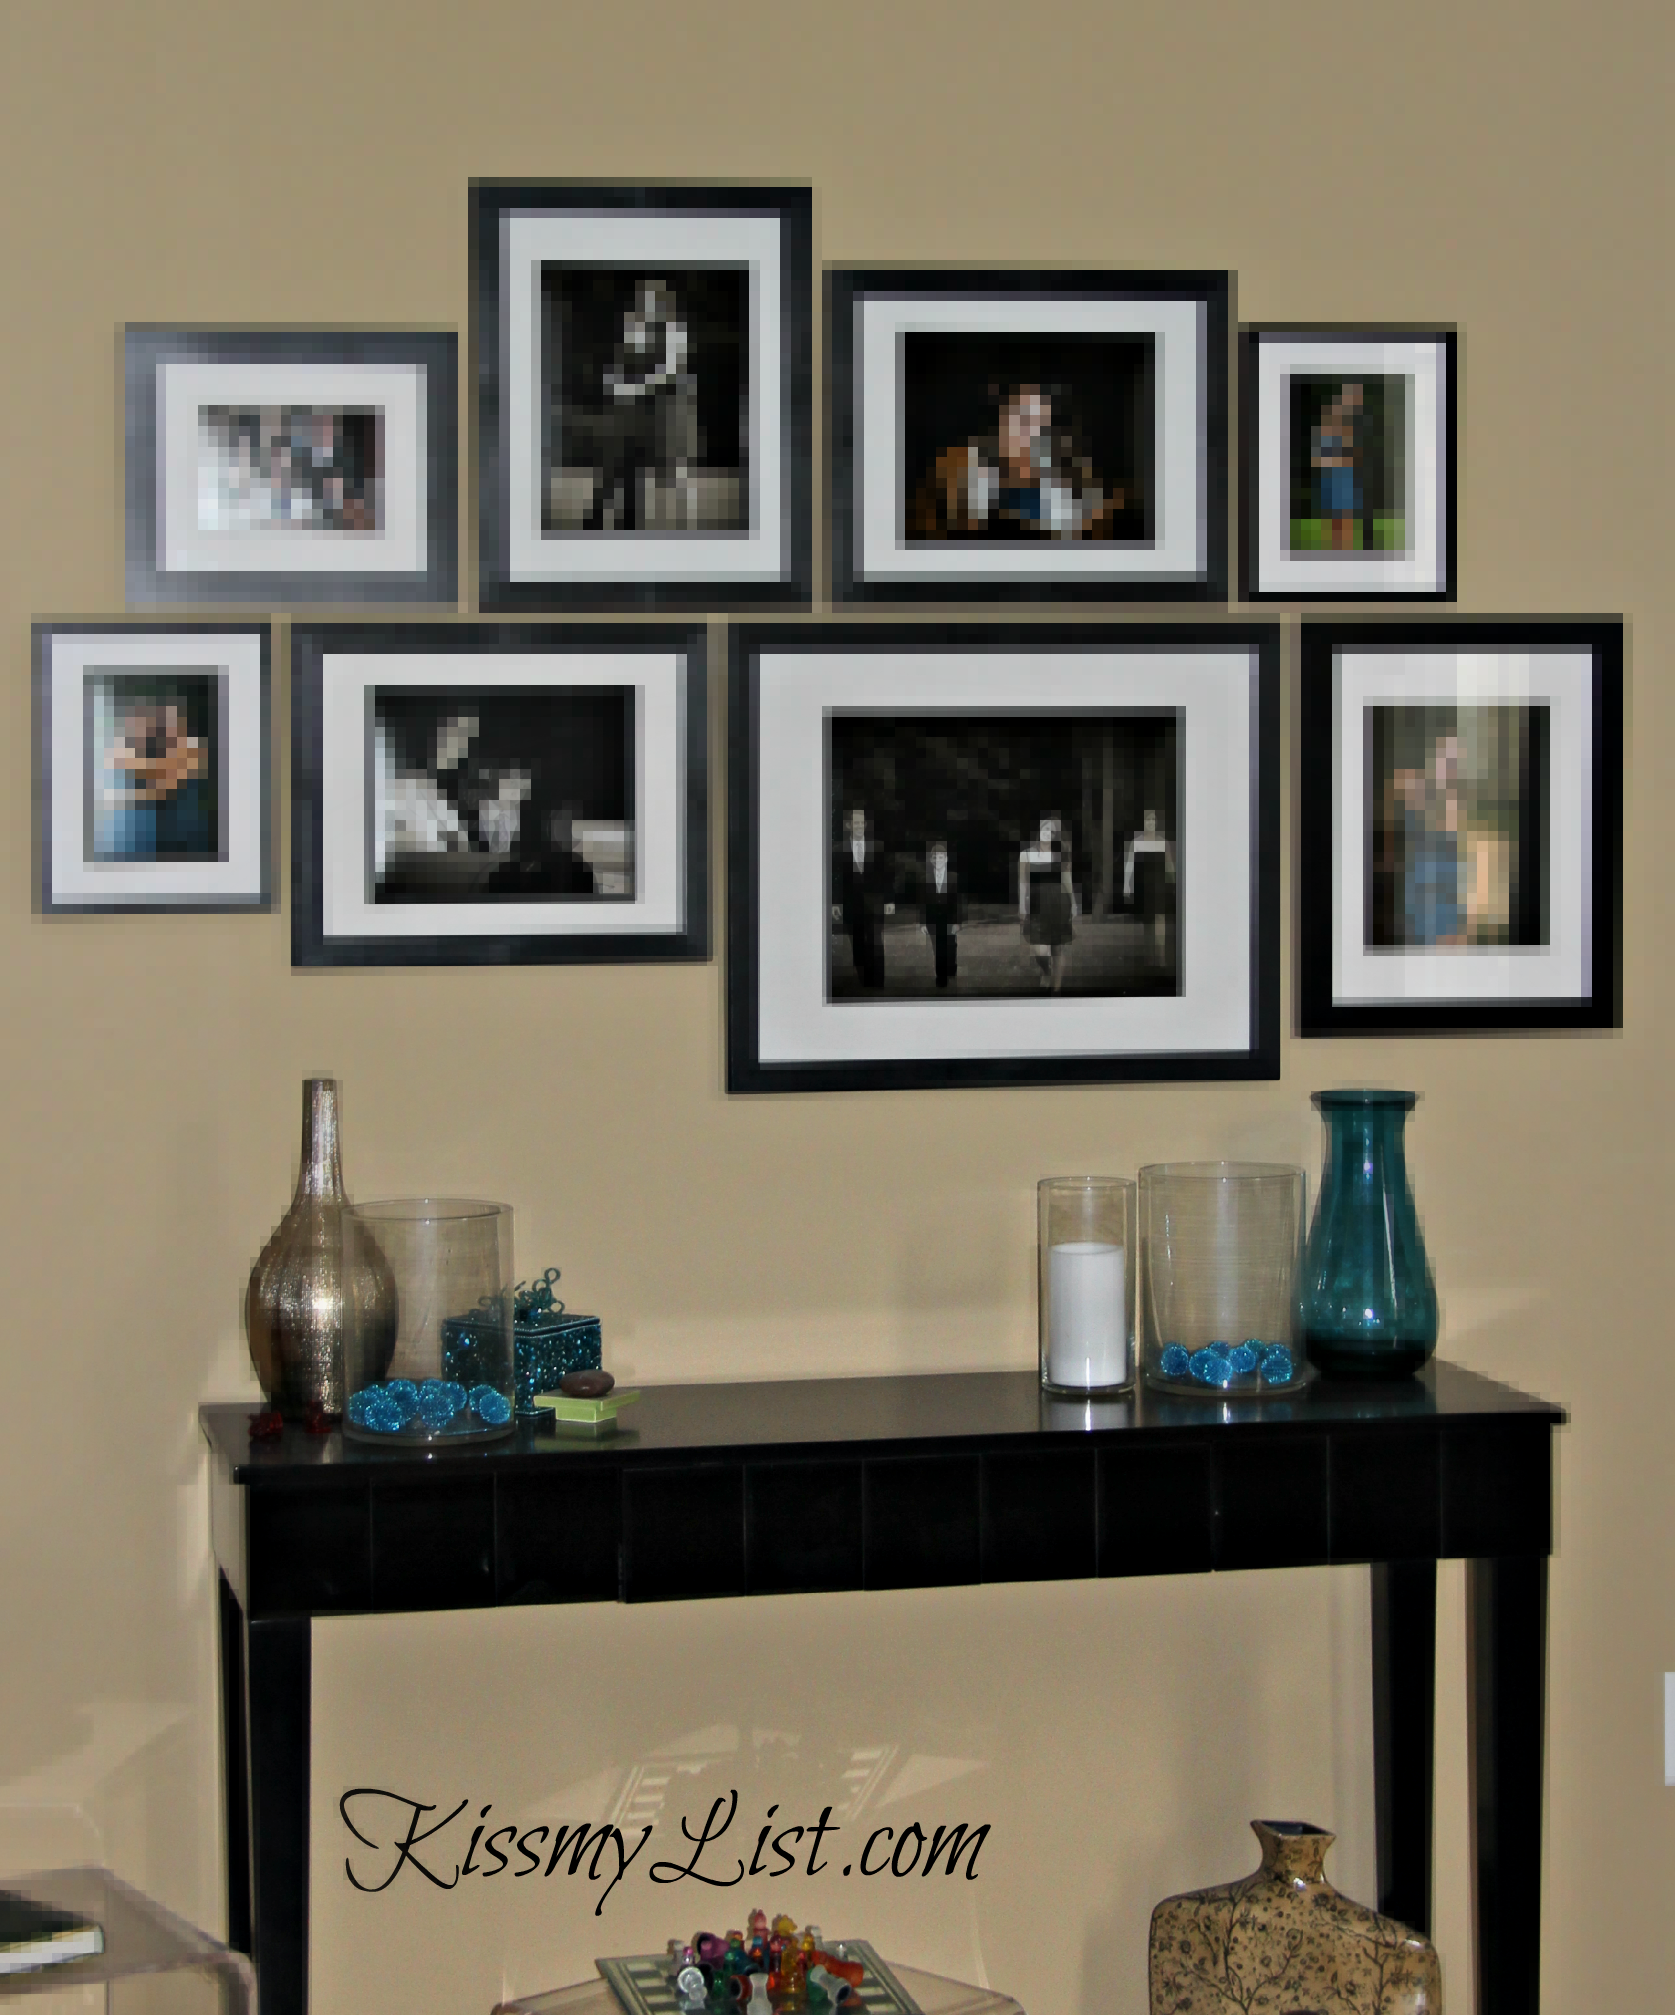
This is an easy option if you feel like you are design-challenged. A linear display requires little creativity, just careful measuring. A cluster of as little as five photos would look great on a neglected wall – in an entryway, going up the stairs, or over a couch. My arrangement is five feet long and almost three feet high; that’s a lot of bang for your buck.
So get hanging!

A level and little bit of poster putty (found at walmart or michaels) on the back bottom corners of the frames helps keep them in place. If one picture in the collage is just a little off, it throws off the whole thing. (after a little wine, you probably won’t care)
Excellent idea, Lisa – thank you! That drives me nuts when the frames tilt even the littlest bit.
Awwww man, I saw a box of frames recently on clearance and I can’t remember where. I looked at it and said I should get these and then I didn’t. I was thinking I’d mess up and have too many holes in the walls or either never attempt to hang them at all. Now you’ve given me some motivation. We don’t have ANY family pictures hanging up. We’ve been here for almost 10 years now and know we aren’t moving so I should go ahead and do that now. Pinning!
No family photos? Get on that right now Kenya! And stay tuned…I have a easy project for wall art that I’m putting up in my kitchen. If it works out I’ll post about it.
This looks really nice Dana! I am afraid that I am not patient enough… nor do I pay attention to fine details to pull this off. But I might give it a try! I have so many photos I want to put out!
You could try it with just five photos – start small. Just take lots of breaks – once I find myself losing patience I stop for awhile. If you try it, let me know how it goes!
This is very helpful! I have photos hanging randomly on a wall in my bedroom and they look bad. I really love the concept of using the horizontal line to define the space and give a starting point for arranging. Thanks for this. Pinning!! And then getting the wine. I can do that first, right? 🙂
Of course you can – but easy on the wine, or your horizontal line will get a little wavy!
This is really really nice. I have several empty walls in my house. We haven’t been able to really put any money towards sprucing it up just yet. I really will be so overjoyed to be able to do something like this though. Great ideas for me to think about for the near future 🙂
It really is a relatively inexpensive way to decorate, especially if you can get frames on sale. I’m sure you’ll have plenty of baby pictures to display!
We have a family photo wall in our house with photos of my family (siblings, parents, grandparents) on one side and my husband’s on the other. In the middle we have a couple of collage frames with pictures of our family (kids, grandkids). You are right. It’s all about the measuring and using the essential tools of a pencil, a ruler and a level. I love your idea of using one horizontal line as your starting point. Brilliant! And you say you aren’t much into DIY …
DIY with power tools are where I have a problem Mo. I just painted some interior doors black and that turned out well too.
This is great information! I am in the middle of decorating my new apartment and I am loving your idea. I can’t wait to have my place complete, but I am taking my time and doing it with love and care!
That’s smart – whenever I rush to decorate I end up regretting it. Enjoy decorating!
I think I’d spread this project over more days so I could have more wine breaks! 😉 Seriously, your wall looks great!
Thanks, Debbie. You could spread it out over many days – just hang one photo each day!
I just learned something new today! I never knew about starting with the horizontal line – but of course that makes perfect sense!
It does. It’s not the only option, but it’s a good one when you have lots of different sized frames and aren’t sure how to start.
I am bookmarking this for the future day I go all crazy and make a photo wall in my home. In the meantime I just might steal this idea for an empty space I have above my work desk… although that might be counterproductive!
I guess it depends how much time you’ll waste gazing at the pictures, right?
Great looking wall, Dana! Our walls are a big mishmash right now because we just threw things on the old nails when we moved in last August. This makes me want to spruce things up… I do like looking at family photos (most of the time!).
Take the old nails out and spackle, Jean. Then you’ll have bare walls and may be more motivated to make a nice arrangement. I’m sure your kids would be happy to help you 🙂
It looks great Dana!! That seems like a smart way to go about doing it. We have a lot of pictures to put up right now…everything has been sitting in a corner forever. I’ll definitely give this a try.
It’s definitely easier to go the WeMontage route, but that doesn’t work for every space. 🙂
Ok first, I love the look of it but will also say that for those of us who are NOT measurers out there, my stairwell looks cool with grouped photos too. Yours looks better though. Go figure. Sigh.
I’m sure yours looks great. I know measuring isn’t for everyone, but for people who panic about making the “perfect” arrangement, this may help.
I laughed out loud when I read #6. The finished wall looks fantastic so that must be the reason! This project sounds like even I could do it, great instructions.
Actually, I had a cup of coffee and a piece of chocolate – I’m not a wine drinker. But you got my point!
That looks AWESOME!!!!!! Now…. where can I do that? I am frantically thinking of what wall to use!!!
Don’t be frantic, Chris 🙂 Just walk around and look for a wall that needs some oomph.
I love the way you have your photos done – looks awesome!!
I love having family pictures displayed!!!
Me too, Kim. That wall arrangement is actually the first one I’ve ever had – I usually just have a one photo in a spot. This makes an impact, though.
Looks fabulous! I need to do a better job of displaying photographs, and this post has totally inspired me! :)-Ashley
Do it, Ashley! You know you wanna 🙂
Nice job Dana. I am so not a DIY’er either. I have always wanted to do a gallery like that but collapse under the weight of having to purchase all the frames 🙂
It’s not that bad Tara. Wait until Michael’s has one of those sales where frames are half off, plus there’s a coupon for an extra 10-15% off. Get the least expensive black matted frames and you are in business!
Great tips! Especially #6 😉
Yes, that seems to be the favorite step!
Beautiful, and these make wonderful focal points, Dana!
Thanks, Michelle. I love the photos (they are great even though you can’t really see them through the blurriness), and they make me smile whenever I walk by my living room.
What a lovely do it yourself creation! I bet it lights up your day everytime you pass by. And you’ve given me an idea. My walls are fuller than full or so I thought. There is a very, very bare wall above the stairs going down to the basement. I can do a pictorial arrangement there. Thank you thank you!
Yay – I’m so happy this inspired you! Please take a picture when you’re done and show me; I’d love to see your handiwork.
I have an idea…why don’t you come to my house and perform steps 1 – 5 while I do step 6? Then we’ll both do step 7. This would work well for me. You in? I’m horrible at decorating. I get anxiety just shopping for decorations. Thanks for the tip!
I’m in! But this is super easy decorating – just buy some frames and throw them up there! You don’t have to be as anal as I am 🙂
This is great! We are horrible at design and decoration. We’ve lived in our house for almost six years now and we have way too many empty walls. I need to hit up a frames sale at Michaels and then have my husband do all the hanging!
Yes you do! You have so many beautiful photos of places you’ve been – they would make a stunning arrangement.
I’m not great at anything DIY either, so this is very useful! Any thoughts on how to adapt this concept for hanging photos up the stairs?
You could use multiple horizontal lines that follow the line of the stairs – penciling them in so they look like stair steps. Then you could arrange photos above and below each line, and have one photo from the lower “step” line up with one from the next “step.” Not sure if that makes sense – it’s hard to describe what I’m picturing. I would definitely cut out newspaper shapes in the size of your frames and play with the arrangement first. This is kind of what I’m thinking: http://thecreativeimperative.blogspot.com/2011/12/stairway-gallery-wall.html Hope that helps!
I have a wall in the upstairs of my home that I display all the family photos. I never really gave it much thought when I threw them up there. I think I need to take them down and follow your steps. They would look a lot better and not such a mish mash.
While I’m here I thought I’d explain that I still cannot reply to you under your comments on my blog. Wanted to let you know that I’m not ignoring you.
I don’t feel ignored – I know you read my comments. I wonder why you can’t reply? Is there another method I can use that would make it easier? I think it the Blogger commenting system.
Good, glad you know that I’m reading your comments 🙂 Most times I’ll post a separate comment as a reply for you. I have no idea why it happens and only with you. Makes me think that someone doesn’t want us talking to each other lol. It must be some glitch. It is annoying though.
I just went to your Google+ page and guess what? I can’t post comment on anything you’ve posted there either. This is really strange.
Figured it out – I was using my Google + profile instead of Blogger, which was marked as no-reply. I switched it so it should work the next time!
That looks great! I had a very home-decorating-gifted friend help me create a photo wall a couple of months ago, and she actually used both a horizontal AND vertical line to keep the rest of the mish-mash looking orderly without it being really obvious. Here it is! http://www.beautyschooldropout.net/?p=3346
It looks great, Sarah. You’re right – it’s orderly but not overly so. And I like your title of “not so extreme home makeover.” Sometimes those are the best kind!
The taking a break with wine is genius, Dana! But seriously, looks gorgeous and I know we have hung our photos, too. Kevin is the artist around and meticulous when it comes to this stuff. So, I guess I am lucky that I have him to do stuff like this and not truly have to worry myself, but if I did I will certainly do the wine trick for sure 🙂
You are lucky – if I left it to Matt, the photos would still be on the CD!
Your wall looks great!!! I started off really well with mine and now it’s morphed into being a giant collage since it’s on a really big wall. It looks unfinished for now (because it is!) but I kind of like that it’s a little “off” – that and the fact that it’s upstairs so we’re the only ones who really see it 🙂
There is something to be said for “a little off” arrangement – usually I prefer a look like that. The horizontal line just worked well for a set number of photos that I don’t plan to add onto. I’ll just make another one for my son’s bar mitzvah – just have to figure out where to put it!
I’m a big fan of #6! I tend to need breaks…a lot. And Michael’s is my best friend. We had something custom framed recently and it was about $400. Really?! No, thanks. There are many Bar/Bat Mitzvahs and more in our future.
And we do have some nice wall real estate. Maybe a whole arrangement of Disney photos!
Yes! You have so many fabulous pictures I don’t know how you would choose.